我的ESP32實做書籍:https://youyouyou.pixnet.net/blog/post/121105860
博客來網址:https://www.books.com.tw/products/0010901195


以往使用ESP32CAM都要透過網路傳輸影像,不然就是拍照放在SD卡,之前有教過拍照然後送到Azure做臉部辨識,但是發現學生總是把照片拍了上下顛倒,或者歪歪扭扭,導致辨識不出來,抱怨說,沒辦法先預覽對準,所以不知道拍到什麼。

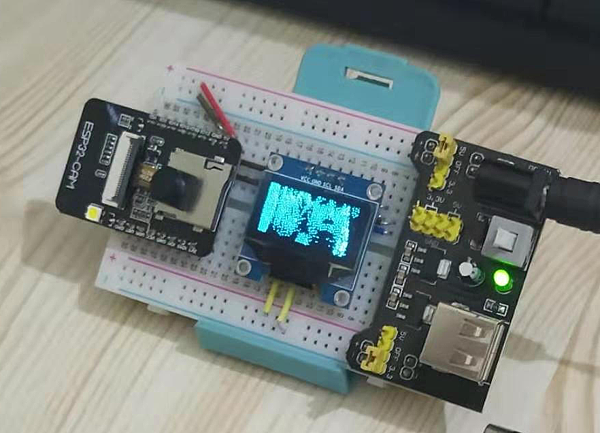
網路找了一些範例,主要有兩種,一種是I2C的OLED,不過畫質很差,主要OLED只有兩色,所以顯示效果類似黑白照片,例如:https://blog.csdn.net/qq_28877125/article/details/99687985

image

另外一種就是SPI TFT,畫面較為流暢,還可以觸控(本文沒有用到),畫面就漂亮多了,本文主要參考這篇:https://blog.xuite.net/iamleon/blog/589421027,然後做了小小修改

一、材料準備

  • ESP32CAM+USBTTL(或ESP32CAM CH340)
  • SPI TFT,型號:TJCTM24028-SPI
  • 杜邦線若干

環境設定請參考這篇:https://youyouyou.pixnet.net/blog/post/119383183,也請先使用範例程式進行測試。

二、接線

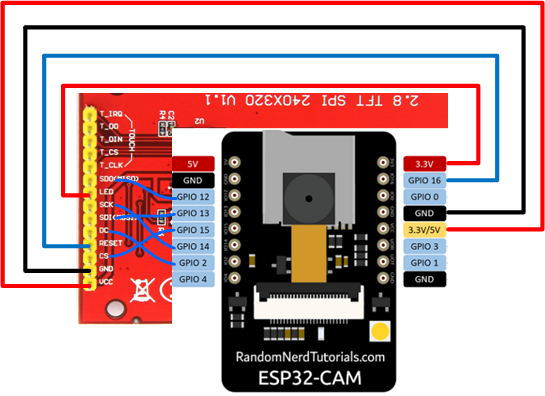
請依照下表完成接線

TFT ESP32CAM
SDO(MISO) 12
LED 3.3V (VCC)
SCK 14
SDI(MOSI) 13
D/C 2
RESET 16
CS 15
GND GND
VCC 3.3V (VCC)


image

原本的文章RESET是接在4,導致閃光亮到眼睛睜不開,所以這裡改用16

三、安裝程式庫:一共有兩個程式庫要安裝

  • TFT程式庫:關鍵字輸入"TFT_eSPI",然後找到作者是"Bodmer"的這個,點安裝。
    image
  • TJpg_Decoder解碼器:關鍵字輸入"TJpg_Decoder",然後找到作者是"Bodmer"的這個,點安裝。
    image

安裝完畢之後,需要修改一下程式庫內的User_Setup.h,主要是因為程式庫內設計是給ESP32而不是ESP32CAM用的,所以要補上一些腳位定義

避免麻煩大家補錯,可以直接下載這個檔案:https://bit.ly/3oRCcyj,並覆蓋掉程式庫內的User_Setup.h,User_Setup.h一般是在「C:\Users\你的帳號\Documents\Arduino\libraries\TFT_eSPI

四、燒錄程式碼

文章標籤

夜市 小霸王 發表在 痞客邦 留言(0) 人氣()

今天遇到一個問題,如何從題庫中亂數挑選不重複的n個題目

原本想說在中介端再處理,但是覺得麻煩,查一下google,有找到資訊


SELECT TOP 3 a.no AS 題目編號,a.question ,a.content,a.answer
FROM dbo.question as a INNER JOIN
(SELECT max(no) as no
FROM dbo.question group by no) as b ON a.no = b.no
WHERE (a.qclass='A02') 
ORDER BY NEWID()


文章標籤

夜市 小霸王 發表在 痞客邦 留言(1) 人氣()

textbox設定為password時,postback後密碼消失,要重新輸入

例如你有一個註冊頁面,上面有帳密資料,但是下方有一個檔案上傳,每次上傳檔案就會產生postback,因為密碼欄位特殊性,會被瀏覽器清除重來,此時利用下面的語法就可以在postback之後,重新把使用者輸入的值補上。


 If IsPostBack Then
      Dim Password As String = TextBox4.Text
      TextBox4.Attributes.Add("value", Password)            
  End If


文章標籤

夜市 小霸王 發表在 痞客邦 留言(0) 人氣()

剛剛在CONCAT兩個字串時,出現以下的錯誤訊息

Cannot resolve collation conflict between "Chinese_Taiwan _Stroke_Cl AS" and "Latin 1_General_ClAI' in concat operator


image


只要在CONCAT到最後的AS中間加上這句即可

CONCAT(a,b) COLLATE Chinese_Taiwan_Stroke_CI_AS as c


文章標籤

夜市 小霸王 發表在 痞客邦 留言(0) 人氣()

最近抓取網頁會出現錯誤
Could not create SSL/TLS secure channel

不過前幾天都還正常,可能是對方升級了網路SSL協定,只要在程式第一行補上這句即可


System.Net.ServicePointManager.SecurityProtocol = DirectCast(3072, System.Net.SecurityProtocolType) Or DirectCast(768, System.Net.SecurityProtocolType) Or DirectCast(192, System.Net.SecurityProtocolType) Or DirectCast(48, System.Net.SecurityProtocolType)


夜市 小霸王 發表在 痞客邦 留言(0) 人氣()

我的ESP32實做書籍:https://youyouyou.pixnet.net/blog/post/121105860
博客來網址:https://www.books.com.tw/products/0010901195


ESP32CAM預設是透過WIFI傳遞mjpeg影像,同網域監看視訊影像很簡單,但是如果跨網域就要利用NAT的IP轉送,設定有點麻煩。

其他的方式,例如將照片上傳到Google空間,或者把照片上傳到Line等。不過都較為複雜

這次則是使用現在最流行的MQTT轉送照片,並用手機觀看,設定VGA品質每5秒一張,測試幾個小時都很正常。

本次感謝網友楊老師,主內容是他的程式,他還有寫一個車牌辨識,改天請他分享

(不過要記得的是我這次用的MQTT沒有安全性,只要有人訂閱同一個Topic就可以觀看你的照片喔)

步驟:

一、材料準備
1.手機,安裝好MQTT APP:MQTT Dash(https://play.google.com/store/apps/details?id=net.routix.mqttdash&hl=zh_TW)

2.ESP32CAM

二、ESP32CAM燒錄以下程式
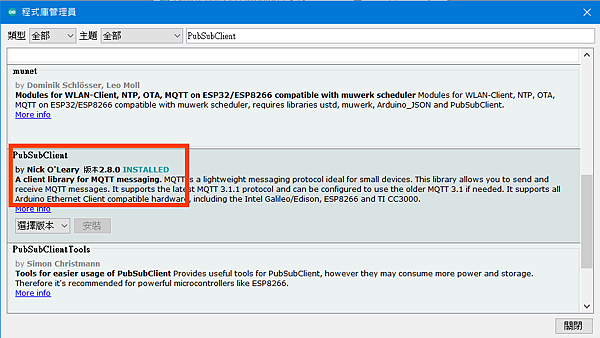
要先安裝程式庫,請利用功能表/草稿碼/匯入程式庫/管理程式庫,輸入關鍵字:PubSubClient,作者為Nick O'Leary這個
image


#include <esp_camera.h>
#include <WiFi.h>
#include <PubSubClient.h>
// ------ 以下修改成你自己的WiFi帳號密碼 ------
const char* ssid = "You";
const char* password = "0933932774";

// ------ 以下修改成你MQTT設定 ------
const char* mqtt_server = "mqtt.eclipseprojects.io";//免註冊MQTT伺服器
const unsigned int mqtt_port = 1883;
#define MQTT_USER               "my_name"             //本案例未使用
#define MQTT_PASSWORD           "my_password"         //本案例未使用
#define MQTT_PUBLISH_Monitor    "yourTopic/esp32cam/pic"  // 放置Binary JPG Image的Topoc,記得要改成自己的


// ------ OV2640相機設定 ------------
#define CAMERA_MODEL_AI_THINKER
#define PWDN_GPIO_NUM     32
#define RESET_GPIO_NUM    -1
#define XCLK_GPIO_NUM      0
#define SIOD_GPIO_NUM     26
#define SIOC_GPIO_NUM     27
#define Y9_GPIO_NUM       35
#define Y8_GPIO_NUM       34
#define Y7_GPIO_NUM       39
#define Y6_GPIO_NUM       36
#define Y5_GPIO_NUM       21
#define Y4_GPIO_NUM       19
#define Y3_GPIO_NUM       18
#define Y2_GPIO_NUM        5
#define VSYNC_GPIO_NUM    25
#define HREF_GPIO_NUM     23
#define PCLK_GPIO_NUM     22


char clientId[50];
void mqtt_callback(char* topic, byte* payload, unsigned int msgLength);
WiFiClient wifiClient;
PubSubClient mqttClient(mqtt_server, mqtt_port, mqtt_callback, wifiClient);

//啟動WIFI連線
void setup_wifi() {
  Serial.printf("\nConnecting to %s", ssid);
  WiFi.begin(ssid, password);
  while (WiFi.status() != WL_CONNECTED) {
    delay(500);
    Serial.print(".");
  }
  Serial.print("\nWiFi Connected.  IP Address: ");
  Serial.println(WiFi.localIP());
}


//MQTT callback,本案例沒使用
void mqtt_callback(char* topic, byte* payload, unsigned int msgLength) {

}

//重新連線MQTT Server
boolean mqtt_nonblock_reconnect() {
  boolean doConn = false;
  if (! mqttClient.connected()) {
    boolean isConn = mqttClient.connect(clientId);
    //boolean isConn = mqttClient.connect(clientId, MQTT_USER, MQTT_PASSWORD);
    char logConnected[100];
    sprintf(logConnected, "MQTT Client [%s] Connect %s !", clientId, (isConn ? "Successful" : "Failed"));
    Serial.println(logConnected);
  }
  return doConn;
}

//MQTT傳遞照片
void MQTT_picture() {
  //camera_fb_t * fb;    // camera frame buffer.
  camera_fb_t * fb = NULL;
  fb = esp_camera_fb_get();
  if (!fb) {
    delay(100);
    Serial.println("Camera capture failed, Reset");
    ESP.restart();
  }

  char* logIsPublished;

  if (! mqttClient.connected()) {
    // client loses its connection
    Serial.printf("MQTT Client [%s] Connection LOST !\n", clientId);
    mqtt_nonblock_reconnect();
  }

  if (! mqttClient.connected())
    logIsPublished = "  No MQTT Connection, Photo NOT Published !";
  else {
    int imgSize = fb->len;
    int ps = MQTT_MAX_PACKET_SIZE;
    // start to publish the picture
    mqttClient.beginPublish(MQTT_PUBLISH_Monitor, imgSize, false);
    for (int i = 0; i < imgSize; i += ps) {
      int s = (imgSize - i < s) ? (imgSize - i) : ps;
      mqttClient.write((uint8_t *)(fb->buf) + i, s);
    }


    boolean isPublished = mqttClient.endPublish();
    if (isPublished)
      logIsPublished = "  Publishing Photo to MQTT Successfully !";
    else
      logIsPublished = "  Publishing Photo to MQTT Failed !";
  }
  Serial.println(logIsPublished);
 esp_camera_fb_return(fb);//清除緩衝區
}


void setup() {
  Serial.begin(115200);
  //相機設定
  camera_config_t config;
  config.ledc_channel = LEDC_CHANNEL_0;
  config.ledc_timer = LEDC_TIMER_0;
  config.pin_d0 = Y2_GPIO_NUM;
  config.pin_d1 = Y3_GPIO_NUM;
  config.pin_d2 = Y4_GPIO_NUM;
  config.pin_d3 = Y5_GPIO_NUM;
  config.pin_d4 = Y6_GPIO_NUM;
  config.pin_d5 = Y7_GPIO_NUM;
  config.pin_d6 = Y8_GPIO_NUM;
  config.pin_d7 = Y9_GPIO_NUM;
  config.pin_xclk = XCLK_GPIO_NUM;
  config.pin_pclk = PCLK_GPIO_NUM;
  config.pin_vsync = VSYNC_GPIO_NUM;
  config.pin_href = HREF_GPIO_NUM;
  config.pin_sscb_sda = SIOD_GPIO_NUM;
  config.pin_sscb_scl = SIOC_GPIO_NUM;
  config.pin_pwdn = PWDN_GPIO_NUM;
  config.pin_reset = RESET_GPIO_NUM;
  config.xclk_freq_hz = 20000000;
  config.pixel_format = PIXFORMAT_JPEG;
  config.jpeg_quality = 10;  //10-63 lower number means higher quality
  config.fb_count = 2;
  //設定照片品質
  config.frame_size = FRAMESIZE_QVGA ;// FRAMESIZE_ + UXGA|SXGA|XGA|SVGA|VGA|CIF|QVGA|HQVGA|QQVGA
  esp_err_t err = esp_camera_init(&config);
  delay(500);
  //啟動WIFI連線
  setup_wifi();
  sprintf(clientId, "ESP32CAM_%04X", random(0xffff));  // Create a random client ID
  //啟動MQTT連線
  mqtt_nonblock_reconnect();  
}


void loop() {
  mqtt_nonblock_reconnect(); 
  MQTT_picture();//用MQTT傳照片
  delay(10000);
}

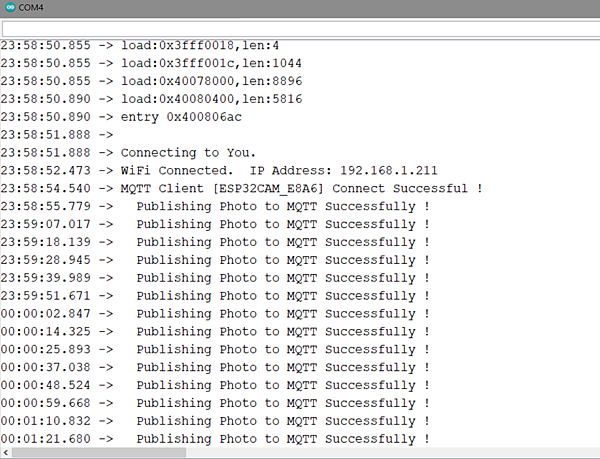
燒錄完成後,如果設定沒問題,就可以從序列視窗看到傳遞成功的畫面

image

接下來就是設定手機的MQTT接收端

三、手機MQTT設定

安裝好APP後,先設定MQTT伺服器

1.點選右上角的 (+) 符號

文章標籤

夜市 小霸王 發表在 痞客邦 留言(0) 人氣()

SQL Server 2017 Configuration Manager打不開時
mofcomp.exe "C:\Program Files (x86)\Microsoft SQL Server\100\Shared\sqlmgmproviderxpsp2up.mof"

後面那一段「100」是你SQL的路徑,請自己找一下


夜市 小霸王 發表在 痞客邦 留言(0) 人氣()

我的ESP32實做書籍:https://youyouyou.pixnet.net/blog/post/121105860
博客來網址:https://www.books.com.tw/products/0010901195


前先日子Google宣布Tensorflow將出一版Tensorflow Micro版,比Tensorflow Lite更小要支援arduino系統,尤其標明要給esp32系列,讓人非常驚奇,大家一開始在PC上跑python tensorflow,後來在樹莓派、Jetson nano上跑Keras Tensorflow,沒想到現在竟然可以在ESP32上面跑Tensorflow。

雖然聽到這樣的消息,但也沒時間去研究,直到某天ESP32愛玩的版友詢問esp32cam要怎麼載入Tensorflow模型,我才知道Arduino程式庫竟然已經有範例了,在這裡就先測試ESP32CAM的人體偵測範例。
先放一張我的輪廓圖
image


一、首先你要有一組ESP32CAM以及一條CP2102下載線,或者ESP32CAM CH340接口加一條USB線。

二、Arduino環境設定可以參考本篇:https://youyouyou.pixnet.net/blog/post/119383183,最好先利用 ESP32/Camera/CameraWebServer 測試,確認晶片及鏡頭運作正常。

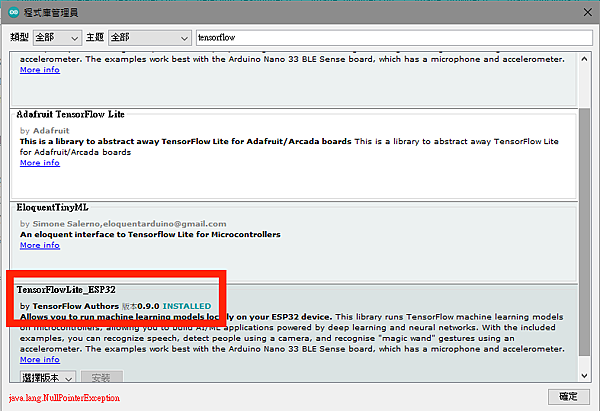
三、Arduino IDE安裝Tensorflow Lite程式庫

  1. 功能表/程式庫/管理程式庫,開啟程式庫管理員
    image
  2. 輸入關鍵字:Tensorflow,找到名稱為TensorFlowLite_ESP32的程式庫,並點選右側安裝

四、載入範例程式

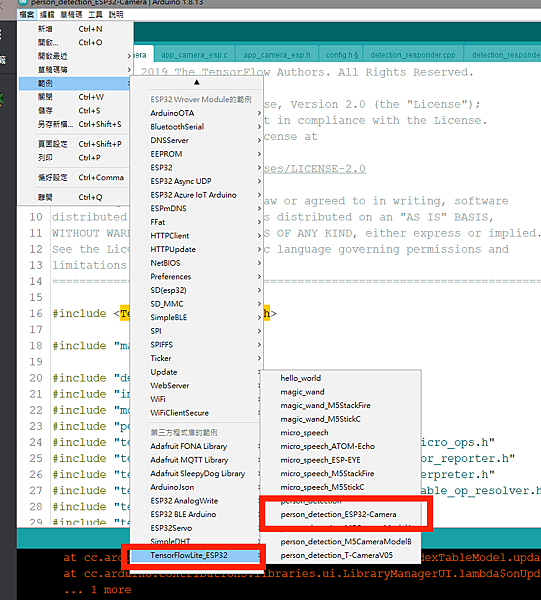
完成程式庫安裝後,直接載入TensorFlowLite_ESP32的範例程式,位置在功能表/檔案/範例/最下方第三方程式庫的範例/TensorFlow_ESP32/person_detection_ESP32-Camera

image

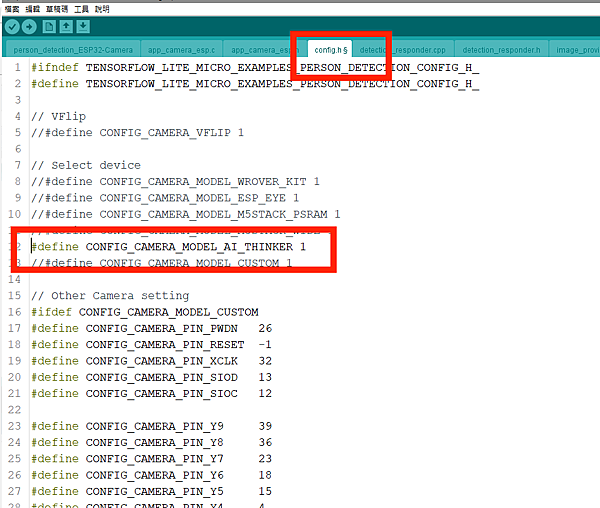
載入後,點選頁簽config.h,將第12行的#define CONFIG_CAMERA_MODEL_AI_THINKER 1前方註解刪除,若您使用別種裝置,請自行選擇型號。

image

完成上述動作後,點選上傳程式碼

五、人體偵測結果

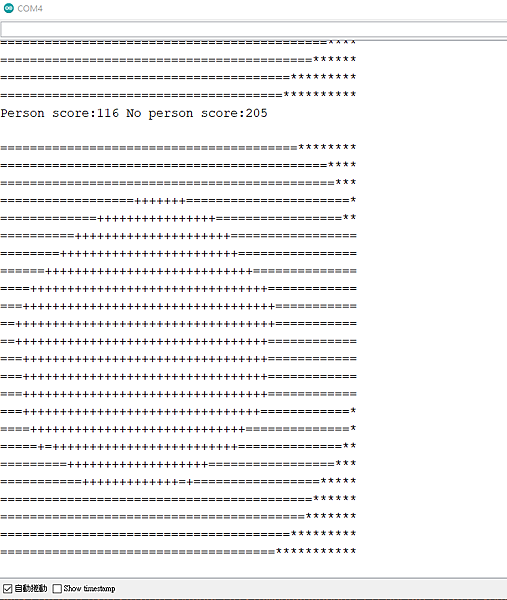
我先照著電腦螢幕看看,分數看得出來,是沒人得分比較多,中間一圈圓圓的應該是很亮的螢幕
image

把螢幕開一個空白的記事本,並放在螢幕上半部,可以看到結果

文章標籤

夜市 小霸王 發表在 痞客邦 留言(1) 人氣()

關於FB login後台設定,請自行參閱FB後台設定指導。這裡只說明如何在使用者按登入後,


一、前端html部份新增一個按鈕,並賦予超連結如下:

<a href="https://www.facebook.com/v8.0/dialog/oauth?client_id=你的client_id&redirect_uri=你的callback網址&state=亂數>你的按鈕</a>

上述的callback網址是使用者如果登入成功後,會返回你的網站的網址,並會附帶一個code讓你進行後續處理,state是返回時會帶給你,讓你確認是不是由你的網站發出(實際上沒什麼用)。

當你收到fb返回callback網址時,就是一連串的get步驟大概如下

二、asp.net後端驗證流程

1.取得使用者權仗:用callback拿到的code換成使用者權杖
        Dim code = Request.QueryString("code")
        Dim webClient1 As New System.Net.WebClient
        Dim UsertokenUrl = "https://graph.facebook.com/v8.0/oauth/access_token?client_id=你的client_id&&redirect_uri=你的callback網址&client_secret=你的FBclient密碼&code=上面拿到的code
        Dim result As String = webClient1.DownloadString(UsertokenUrl)
        Dim Usertoken = JsonConvert.DeserializeObject(Of Object)(result)

取得的result 內容如下:

"{""access_token"":""使用者權杖"",""token_type"":""bearer"",""expires_in"":時間}"


2.取得應用程式權杖:應用程式權杖是你FB的權杖,目的是用來完成步驟3取得使用者user_id
        Dim AccesstokenUrl = "https://graph.facebook.com/oauth/access_token?client_id=你的client_id&client_secret=你的FBclient密碼&grant_type=client_credentials"
        Dim result1 As String = webClient1.DownloadString(AccesstokenUrl)
        Dim Accesstoken= JsonConvert.DeserializeObject(Of Object)(result1)

文章標籤

夜市 小霸王 發表在 痞客邦 留言(0) 人氣()

我的ESP32實做書籍:https://youyouyou.pixnet.net/blog/post/121105860
博客來網址:https://www.books.com.tw/products/0010901195


以往利用ESP32CAM都只是短時間測試一下,主要是因為是Webserver,要自己開瀏覽器連進去才能看,最近有一位ESP32愛玩群組的網友PO了一篇把ESP32改監視器常用的RTSP協定,這樣就可以接上我家的QNAP做長期監視錄影了,那就來測試看看。

首先連線到函式庫網址:https://github.com/geeksville/Micro-RTSP

下載打包zip後,利用arduino內的功能表/草稿碼/匯入函式庫/加入.zip檔案方式安裝本函式庫。

在github中的範例程式包含LCD等配件,我都先刪除,精簡後的程式如下


#include <WiFi.h>
#include <WebServer.h>
#include <WiFiClient.h>
#include "OV2640.h"
#include "SimStreamer.h"
#include "OV2640Streamer.h"
#include "CRtspSession.h"

char *ssid = "ssid";        // Put your SSID here
char *password = "password";      // Put your PASSWORD here

WebServer server(80);
WiFiServer rtspServer(554);
OV2640 cam;
CStreamer *streamer;

//mjpeg串流
void handle_jpg_stream(void)
{
  WiFiClient client = server.client();
  String response = "HTTP/1.1 200 OK\r\n";
  response += "Content-Type: multipart/x-mixed-replace; boundary=frame\r\n\r\n";
  server.sendContent(response);

  while (1)
  {
    cam.run();
    if (!client.connected())
      break;
    response = "--frame\r\n";
    response += "Content-Type: image/jpeg\r\n\r\n";
    server.sendContent(response);

    client.write((char *)cam.getfb(), cam.getSize());
    server.sendContent("\r\n");
    if (!client.connected())
      break;
  }
}

//靜態影像
void handle_jpg(void)
{
  WiFiClient client = server.client();
  cam.run();
  if (!client.connected())
  {
    return;
  }
  String response = "HTTP/1.1 200 OK\r\n";
  response += "Content-disposition: inline; filename=capture.jpg\r\n";
  response += "Content-type: image/jpeg\r\n\r\n";
  server.sendContent(response);
  client.write((char *)cam.getfb(), cam.getSize());
}

//錯誤處理
void handleNotFound() {
  String message = "Server is running!\n\n";
  message += "URI: ";
  message += server.uri();
  message += "\nMethod: ";
  message += (server.method() == HTTP_GET) ? "GET" : "POST";
  message += "\nArguments: ";
  message += server.args();
  message += "\n";
  server.send(200, "text/plain", message);
}

//WiFi連線
void WifiConnecte() {
  //開始WiFi連線
  WiFi.begin(ssid, password);
  while (WiFi.status() != WL_CONNECTED) {
    delay(500);
    Serial.print(".");
  }
  Serial.println("WiFi連線成功");
  Serial.print("IP Address:");
  Serial.println(WiFi.localIP());
}

void setup()
{
  Serial.begin(115200);
  //設定影像大小:UXGA(1600x1200),SXGA(1280x1024),XGA(1024x768),SVGA(800x600),VGA(640x480),CIF(400x296),QVGA(320x240),HQVGA(240x176),QQVGA(160x120)
  esp32cam_aithinker_config.frame_size = FRAMESIZE_UXGA;
  esp32cam_aithinker_config.jpeg_quality = 10;
  cam.init(esp32cam_aithinker_config);
  //開始WiFi連線
  WifiConnecte();
  
  server.on("/", HTTP_GET, handle_jpg_stream);
  server.on("/jpg", HTTP_GET, handle_jpg);
  server.onNotFound(handleNotFound);
  server.begin();
  rtspServer.begin();
  streamer = new OV2640Streamer(cam);//啟動服務
  Serial.println("WiFi connected");
  Serial.print("Use 'http://");
  Serial.print(WiFi.localIP());
  Serial.println("/' to watch mjpeg stream");
  Serial.print("Use 'http://");
  Serial.print(WiFi.localIP());
  Serial.println("/jpg' to see still jpg");
  Serial.print("Use RTSP:'");
  Serial.print(WiFi.localIP());
  Serial.println("', URL:'/mjpeg/1' and port:554 to start rtsp stream");
}

void loop() {
  if (WiFi.status() != WL_CONNECTED) {
    WifiConnecte();
  }
  server.handleClient();
  uint32_t msecPerFrame = 100;
  static uint32_t lastimage = millis();
  // If we have an active client connection, just service that until gone
  streamer->handleRequests(0); // we don't use a timeout here,
  // instead we send only if we have new enough frames
  uint32_t now = millis();
  if (streamer->anySessions()) {
    if (now > lastimage + msecPerFrame || now < lastimage) { // handle clock rollover
      streamer->streamImage(now);
      lastimage = now;

      // check if we are overrunning our max frame rate
      now = millis();
      if (now > lastimage + msecPerFrame) {
        printf("warning exceeding max frame rate of %d ms\n", now - lastimage);
      }
    }
  }
  WiFiClient rtspClient = rtspServer.accept();
  if (rtspClient) {
    Serial.print("client: ");
    Serial.print(rtspClient.remoteIP());
    Serial.println();
    streamer->addSession(rtspClient);
  }
}


程式燒錄完畢之後,就開通兩個功能1.web mjpeg串流 及 2.RTSP串流,目前的程式兩者同時只能有一個連入,使用web連上後,rtsp會自己斷掉,當web關閉後,rtsp會重新啟動。

程式啟動後,序列埠的訊息如下,會通知您的ESP32取得的IP,還有指示要如何查看stream及設定RTSP
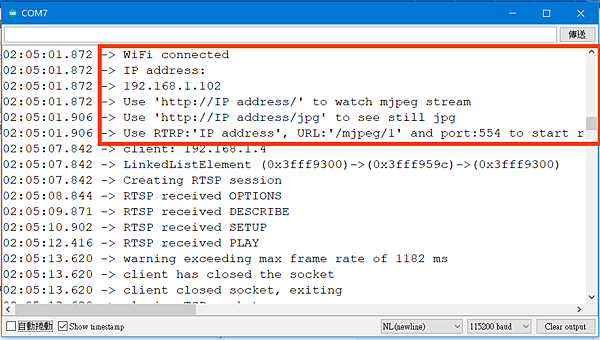
image

我們可以先用WEB連看看畫面正不正常,內容不像預設的CameraWebServer範例那麼多功能,就只有一個畫面做串流而已。

image

那麼如果你有synology或qnap這類的機器該如何設定錄影功能呢?

我這裡以qnap的Surveillance Station為例

image

1.開啟Surveillance Station

2.新增一台攝影機,選擇以下參數
廠牌:Generic Model
機型:Generic JPEG
URL:/mjpeg/1
名稱:任意輸入,例如倉庫、書房
網路位置:取得的IP
埠號:554

image

觀察連線狀況正常
image

利用qnap的播放器也很正常
image

文章標籤

夜市 小霸王 發表在 痞客邦 留言(9) 人氣()