Cluster的優點是使用冗餘系統,達成高度可用,當節點故障會有其他伺服器保持服務。可惜的是沒有做自動覆載平衡,前端必須指定一台SQL來存取資料,不過可以用連線候選清單的方式處理就是了(這個IP連不上時,換下一個IP)

整個系統分成三種節點
一、Manager Node:管理整體服務節點,管理整體架構資源服務
二、SQL Node:資料庫服務節點,實際的資料庫服務
三、Data Node:資料儲存體節點,儲存資料用
另外還包括
四、Client端Workbench連線與測試
一、Manager Node:管理整體服務節點,管理整體架構資源服務
二、SQL Node:資料庫服務節點,實際的資料庫服務
三、Data Node:資料儲存體節點,儲存資料用
另外還包括
四、Client端Workbench連線與測試
零、資料準備
1.準備至少4台VM主機,並安裝Ubuntu 18.04,建議使用VBox
2.準備4~5組IP(本例為5組)
-Manager Node x 1:192.168.1.100
-SQL Node x 2:192.168.1.105、192.168.1.106
-Data Node x 2:192.168.1.111、192.168.1.112
3.可以先移除Ubuntu 的firewall 方法:進入終端機模式後,輸入
$sudo apt-get remove ufw
1.準備至少4台VM主機,並安裝Ubuntu 18.04,建議使用VBox
2.準備4~5組IP(本例為5組)
-Manager Node x 1:192.168.1.100
-SQL Node x 2:192.168.1.105、192.168.1.106
-Data Node x 2:192.168.1.111、192.168.1.112
3.可以先移除Ubuntu 的firewall 方法:進入終端機模式後,輸入
$sudo apt-get remove ufw
之所以安裝在Ubuntu,其實是因為首先我嘗試安裝在Windows Server上,困難重重,一天後放棄,網路上的教學偏重安裝於Linux,我才選了Ubuntu,可以在這裡下載,我下載18.04版本 https://www.ubuntu-tw.org/modules/tinyd0/
而安裝教學可以參考網站,寫的非常詳細 https://blog.xuite.net/yh96301/blog/341994889-%E5%AE%89%E8%A3%9DUbuntu+18.04
以下開始安裝三個節點,我是參考這篇,但有些要更新 https://www.digitalocean.com/community/tutorials/how-to-create-a-multi-node-mysql-cluster-on-ubuntu-18-04
一、管理節點安裝Manager Node 登入管理節點後,進入終端機模式
1.下載ndb_mgmd 管理端安裝檔案,請注意這裡的7.6.9代表版本,若你要安裝其他版本,可直接改版本代號即可。
$wget https://dev.mysql.com/get/Downloads/MySQL-Cluster-7.6/mysql-cluster-community-management-server_7.6.9-1ubuntu18.04_amd64.deb
2.安裝管理端程式
$sudo dpkg -i mysql-cluster-community-management-server_7.6.9-1ubuntu18.04_amd64.deb 3.建立管理端資料夾
$ sudo mkdir /var/lib/mysql-cluster
4.建立config.ini設定檔
$sudo nano /var/lib/mysql-cluster/config.ini
5.輸入config.ini內容(一開始只能設定一個管理端ndb_mgmd,否則系統不知道如何指定安裝node編號),貼上下列內容後,按Ctrl^o存檔,Ctrl^x退出(記得改成您的網路環境)
[ndbd default]
# Options affecting ndbd processes on all data nodes:
NoOfReplicas=2  # Number of replicas

[ndb_mgmd]
# Management process options:
hostname=192.168.1.101 # Hostname of the manager
datadir=/var/lib/mysql-cluster  # Directory for the log files

[ndbd]
hostname=192.168.1.111 # Hostname/IP of the first data node
NodeId=2            # Node ID for this data node
datadir=/usr/local/mysql/data   # Remote directory for the data files

[ndbd]
hostname=192.168.1.112 # Hostname/IP of the second data node
NodeId=3            # Node ID for this data node
datadir=/usr/local/mysql/data   # Remote directory for the data files

[mysqld]
NodeId=4
hostname=192.168.1.105
[mysqld]
NodeId=5
ostname=192.168.1.106
6.嘗試啟動服務
$sudo ndb_mgmd -f /var/lib/mysql-cluster/config.ini
會出現以下結果代表啟動成功:
$sudo ndb_mgmd -f /var/lib/mysql-cluster/config.ini
會出現以下結果代表啟動成功:
MySQL Cluster Management Server mysql-5.7.22 ndb-7.6.6
2018-07-25 21:48:39 [MgmtSrvr] INFO     -- The default config directory '/usr/mysql-cluster' does not exist. Trying to create it...
2018-07-25 21:48:39 [MgmtSrvr] INFO     -- Successfully created config directory
7.如果成功,可以把管理端程式改成隨著啟動的服務,所以先關閉現有服務,做服務設定 $sudo pkill -f ndb_mgmd
8.建立服務設定檔,複製貼上後按Ctrl^o存檔,Ctrl^x退出
$sudo nano /etc/systemd/system/ndb_mgmd.service
8.建立服務設定檔,複製貼上後按Ctrl^o存檔,Ctrl^x退出
$sudo nano /etc/systemd/system/ndb_mgmd.service
[Unit]
Description=MySQL NDB Cluster Management Server
After=network.target auditd.service

[Service]
Type=forking
ExecStart=/usr/sbin/ndb_mgmd -f /var/lib/mysql-cluster/config.ini
ExecReload=/bin/kill -HUP $MAINPID
KillMode=process
Restart=on-failure

[Install]
WantedBy=multi-user.target
9.載入上述設定檔
$sudo systemctl daemon-reload
10.設定服務隨開機啟動
$sudo systemctl enable ndb_mgmd
11.啟動服務
$sudo systemctl start ndb_mgmd
12.查看服務啟動狀態,若回覆狀態類似下表,則代表管理端已經完成啟動
$sudo systemctl status ndb_mgmd
$sudo systemctl daemon-reload
10.設定服務隨開機啟動
$sudo systemctl enable ndb_mgmd
11.啟動服務
$sudo systemctl start ndb_mgmd
12.查看服務啟動狀態,若回覆狀態類似下表,則代表管理端已經完成啟動
$sudo systemctl status ndb_mgmd
ndb_mgmd.service - MySQL NDB Cluster Management Server
   Loaded: loaded (/etc/systemd/system/ndb_mgmd.service; enabled; vendor preset: enabled)
   Active: active (running) since Thu 2018-07-26 21:23:37 UTC; 3s ago
  Process: 11184 ExecStart=/usr/sbin/ndb_mgmd -f /var/lib/mysql-cluster/config.ini (code=exited, status=0/SUCCESS)
 Main PID: 11193 (ndb_mgmd)
    Tasks: 11 (limit: 4915)
   CGroup: /system.slice/ndb_mgmd.service
           └─11193 /usr/sbin/ndb_mgmd -f /var/lib/mysql-cluster/config.ini
二、 資料節點安裝Data Node 主機切換到進入data node主機,並記得每台data node都要做。進入終端機模式
1.下載安裝程式,版本建議與管理端一致
$wget https://dev.mysql.com/get/Downloads/MySQL-Cluster-7.6/mysql-cluster-community-data-node_7.6.9-1ubuntu18.04_amd64.deb
2.檢查更新,並下載程式
$sudo apt update $sudo apt install libclass-methodmaker-perl
3.安裝data node節點程式
$sudo dpkg -i mysql-cluster-community-data-node_7.6.9-1ubuntu18.04_amd64.deb
4.建立設定檔,輸入完畢後,按Ctrl^o存檔,Ctrl^x退出
$sudo nano /etc/my.cnf
[mysql_cluster]
# Options for NDB Cluster processes:
ndb-connectstring=192.168.1.101  # location of cluster manager
5.建立資料路徑
$sudo mkdir -p /usr/local/mysql/data
6.啟動節點服務,若出現下面的視窗,代表連線到管理節點成功
$sudo ndbd
$sudo mkdir -p /usr/local/mysql/data
6.啟動節點服務,若出現下面的視窗,代表連線到管理節點成功
$sudo ndbd
2018-07-18 19:48:21 [ndbd] INFO     -- Angel connected to '192.168.1.101:1186'
2018-07-18 19:48:21 [ndbd] INFO     -- Angel allocated nodeid: 2
7.先關閉服務,我們要將之改成隨開機的服務
$sudo pkill -f ndbd
8.建立服務設定檔,輸入完畢後,按Ctrl^o存檔,Ctrl^x退出
$sudo nano /etc/systemd/system/ndbd.service
$sudo pkill -f ndbd
8.建立服務設定檔,輸入完畢後,按Ctrl^o存檔,Ctrl^x退出
$sudo nano /etc/systemd/system/ndbd.service
[Unit]
Description=MySQL NDB Data Node Daemon
After=network.target auditd.service

[Service]
Type=forking
ExecStart=/usr/sbin/ndbd
ExecReload=/bin/kill -HUP $MAINPID
KillMode=process
Restart=on-failure

[Install]
WantedBy=multi-user.target
9.載入服務設定檔
$sudo systemctl daemon-reload
10.設定為隨開機的服務
$sudo systemctl enable ndbd
11.立即啟動服務,會看到以下視窗,代表服務啟動成功
$sudo systemctl status ndbd
$sudo systemctl daemon-reload
10.設定為隨開機的服務
$sudo systemctl enable ndbd
11.立即啟動服務,會看到以下視窗,代表服務啟動成功
$sudo systemctl status ndbd
ndbd.service - MySQL NDB Data Node Daemon
   Loaded: loaded (/etc/systemd/system/ndbd.service; enabled; vendor preset: enabled)
   Active: active (running) since Thu 2018-07-26 20:56:29 UTC; 8s ago
  Process: 11972 ExecStart=/usr/sbin/ndbd (code=exited, status=0/SUCCESS)
 Main PID: 11984 (ndbd)
    Tasks: 46 (limit: 4915)
   CGroup: /system.slice/ndbd.service
           ├─11984 /usr/sbin/ndbd
           └─11987 /usr/sbin/ndbd
三、資料庫服務安裝SQL Node 進入終端機模式
1.下載資料庫程式:
$wget https://dev.mysql.com/get/Downloads/MySQL-Cluster-7.6/mysql-cluster_7.6.9-1ubuntu18.04_amd64.deb-bundle.tar
2.建立安裝目錄
$mkdir install
3.解壓縮並安裝
$tar -xvf mysql-cluster_7.6.9-1ubuntu18.04_amd64.deb-bundle.tar -C install/ $cd install
4.檢查更新
$sudo apt update $sudo apt install libaio1 libmecab2
5.分別執行以下1-4個cluster資料庫工具的安裝步驟 ,過程中會問你Mysql的帳號密碼,輸入完畢後按OK即可
-1.$sudo dpkg -i mysql-common_7.6.9-1ubuntu18.04_amd64.deb
-2.$sudo dpkg -i mysql-cluster-community-client_7.6.9-1ubuntu18.04_amd64.deb -3.$sudo dpkg -i mysql-client_7.6.9-1ubuntu18.04_amd64.deb
-4.$sudo dpkg -i mysql-cluster-community-server_7.6.9-1ubuntu18.04_amd64.deb
6.安裝mysql資料庫程式
$sudo dpkg -i mysql-server_7.6.9-1ubuntu18.04_amd64.deb
7.修改mysql資料庫設定檔
$sudo nano /etc/mysql/my.cnf
# Copyright (c) 2015, 2016, Oracle and/or its affiliates. All rights reserved.
#
# This program is free software; you can redistribute it and/or modify
# it under the terms of the GNU General Public License as published by
# the Free Software Foundation; version 2 of the License.
#
# This program is distributed in the hope that it will be useful,
# but WITHOUT ANY WARRANTY; without even the implied warranty of
# MERCHANTABILITY or FITNESS FOR A PARTICULAR PURPOSE.  See the
# GNU General Public License for more details.
#
# You should have received a copy of the GNU General Public License
# along with this program; if not, write to the Free Software
# Foundation, Inc., 51 Franklin St, Fifth Floor, Boston, MA  02110-1301 USA

#
# The MySQL Cluster Community Server configuration file.
#
# For explanations see
# http://dev.mysql.com/doc/mysql/en/server-system-variables.html

# * IMPORTANT: Additional settings that can override those from this file!
#   The files must end with '.cnf', otherwise they'll be ignored.
#
!includedir /etc/mysql/conf.d/
!includedir /etc/mysql/mysql.conf.d/
#-------------------新增以下資料--------------------
[mysqld]
# Options for mysqld process:
ndbcluster                      # run NDB storage engine

[mysql_cluster]
# Options for NDB Cluster processes:
ndb-connectstring=192.168.1.101  # location of management server
bind-address = 0.0.0.0
ndb-connectstring=192.168.1.101 :是指管理端IP
bind-address = 0.0.0.0 :代表可提供外部網路連線remote管理,沒有這句的話,SQL服務只能在local端使用
bind-address = 0.0.0.0 :代表可提供外部網路連線remote管理,沒有這句的話,SQL服務只能在local端使用
8.重新載入設定檔
$sudo systemctl restart mysql
9.設定mysql為隨著開機啟動
$sudo systemctl enable mysql
10.安裝MYSQL Workbench,並設定root user存取位置為%

11.存檔後,重開mysql server
四、Client端Workbench連線與測試 接下來要測試是否正常
1.Manager Node安裝管理服務程式,請執行「三、資料庫服務安裝」的第1,2,3,4點以及第5點的-1,-2,-3的安裝。
2.執行 ndb_mgm ,進入管理模式,輸入show,即可列出這個cluster的整體架構
ndbd=資料節點data node
ndb_mgmd=管理節點Manager Node
mysqld=資料庫服務節點SQL Node
連線不成功的會出現not connected
1.Manager Node安裝管理服務程式,請執行「三、資料庫服務安裝」的第1,2,3,4點以及第5點的-1,-2,-3的安裝。
2.執行 ndb_mgm ,進入管理模式,輸入show,即可列出這個cluster的整體架構
ndbd=資料節點data node
ndb_mgmd=管理節點Manager Node
mysqld=資料庫服務節點SQL Node
連線不成功的會出現not connected

3.以workbench進行連線 連線對象是cluster內任何一個SQL node,我們新增一個連線,選192.168.1.105,帳號密碼用安裝時設定的帳密即可完成連線,也就是說cluster的存取與一般mysql資料庫狀態無差異。

修改config.ini後,重新載入的方法 參考網址:https://shazi.info/%E6%9E%B6%E8%A8%AD-ha-%E9%AB%98%E5%8F%AF%E7%94%A8%E6%80%A7%EF%BC%9Amysql-cluster-%E5%8F%A2%E9%9B%86-%E6%9E%B6%E8%A8%AD%E7%AC%AC%E4%BA%8C%E5%8F%B0-management-node/
$sudo pkill -f ndb_mgmd $sudondb_mgmd -f /var/lib/mysql-cluster/config.ini --configdir=/var/lib/mysql-cluster --reload
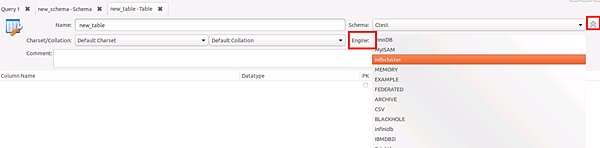
同步寫入資料的方式:建立資料表時須指定使用 ndbcluster 引擎,才算是用到Cluster資料集,才可多點同步,否則只是利用了該MYSQL內部的InnoDB,並非是存在叢集里。
全站熱搜

 留言列表
留言列表