我的ESP32實做書籍:https://youyouyou.pixnet.net/blog/post/121105860
博客來網址:https://www.books.com.tw/products/0010901195
ESP內建的WiFi上網,我們就可以將收集到的資料存入雲端資料庫,方便立即查看即時狀況,而且有長期的資料後就可以進行後續分析與比較,也能在發生異常時發出Mail, Line等通知管理者,達到立即處理的功能,這樣才算真正發揮IoT裝置的功能。
本章要介紹如何將DHT11的溫濕度等資料上傳到自己建立的資料庫,若讀者沒有網路伺服器可以建立MySQL,則可跳過本章,直接閱讀下一章「ESP32 資料庫存取ThingSpeak圖表製作」,不需要自己建立資料庫,畢竟資料庫伺服器的管理維護問題之外,還有網路連線IP、DDNS、NAT、虛擬伺服器、連接埠轉送等網路相關的知識,再加上SQL資料庫的維護與語法也是一個很大的議題。不過自己建立資料庫的好處則是資料儲存、使用、及後續管理與查詢都是由自己掌控,相對更加自由,這也是很多進階玩家選擇這樣作法的原因。
另外要說明的則是本篇介紹的方法是讓ESP32與MySQL直接建立連接,而不是更正式的三層式(Three Tier)作法,也就是讓ESP32透過HTTP Post或Get傳資料到AP Server,而AP Server再存入資料庫中的間接連線方式。
為了快速讓讀者能完成練習,本章分成以下幾個部份說明
一、環境設定:安裝MySQL及workbench
二、線路佈置:連接ESP32及DHT11
三、程式開發:在Arduino IDE中撰寫程式
一、環境設定
本章使用MySQL最大的好處是,他是免費的,執行效能也不差,另外就是workbench,這是懶人的福音,如果你跟我一樣,對cmd界面不熟悉,你一定要安裝workbench,他提供你完整的MySQL圖形界面操作模式,真心推薦。
1.安裝MySQL伺服器,安裝方式網路非常多介紹,請自行google,或參考這篇: https://jerrynest.io/windows-mysql-installer/ ,下載的網址: https://dev.mysql.com/downloads/installer/ ,題外話,如果你想用cluster版,可參考本人本篇文章: http://youyouyou.pixnet.net/blog/post/119326123
2.安裝workbench,下載網址: https://www.mysql.com/products/workbench/
3.將workbench連線到mysql資料庫
workbench安裝完畢後,我們就可以透過workbench進入資料庫,以進行設定,包括建立新的資料庫欄位以及開放讓IoT可連入更新資料,讓Arduino可以WiFi遠端更新資料庫,
3.1 Workbench連線
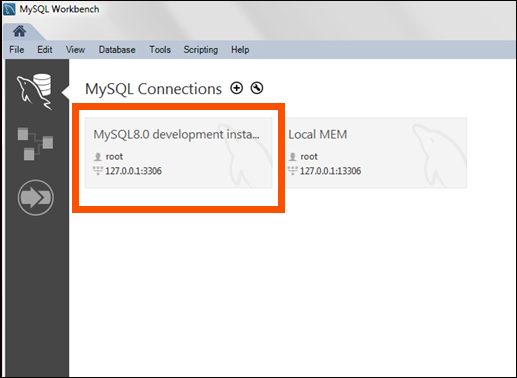
一般Workbench安裝完畢都會建立一個連線是直接連線到本機端MySQL,名稱是127.0.0.1直接打開即可。
3.2 建立新資料庫
點選左上方的Create new schema圖示,以建立資料庫,將存放DHT11傳入的溫濕度資料。

資料庫名稱可自己取名,但不可用中文,例如筆者將新的資料庫取名為「tempandhumd」,代表收取的是溫度及濕度,完成名稱輸入後Collation依照預設值Server Default即可,最後按右下角的Apply即會看到完成的視窗。

再來建立資料表,在剛建好的資料庫前方+號點開,在table上按右鍵,選擇Create Table,建立資料表。

建立的資料表名稱為「datalog」,欄位除了溫度、濕度之外,可用自動編號當作主鍵,最後在給一個更新時間,因此有四個欄位設定如下
1. id:整數,(代表自動編號欄位)
2. temp:整數(代表溫度欄位)
3. humd:整數(代表溼度欄位)
4. updatetime:timestamp(代表資料時間欄位),並給予預設值:CURRENT_TIMESTAMP,目的是這樣當資料新增時,直接給插入資料的時間。
然有四個欄位,但實際上我們僅須給temp跟humd即可,id與updatetime都是sql資料庫直接給值得。這樣比較簡單。

4. 修改MySQL遠端連線設定
因為安全考量,預設MySQL只允許本機登入而不能外部連入,但是我們的Arduino IoT裝置是屬於外部裝置,因此必須將使用者開放外部登入,這裡必須說明,這樣的作法是有安全性問題的,只建議自己建立伺服器來測試,不要拿公司或學校的伺服器來測試。
修改root使用者由原本的localhost改為%,代表該使用者可以從網路上任何地點連進資料庫來進行修改。 完成後按下方的Apply即可存檔。

5. 修改認證方式
因為後續有網友反應資料傳遞失敗,錯誤訊息是「Client does not support authentication protocol requested by server」,經查詢是因為MySQL 8.0的認證方式已經升級,但目前Arduino的MySQL函式庫並未升級,目前的方式,暫時將MySQL的連線認證方式降級,作法為開啟MySQL Command視窗,並輸入以下指令。
ALTER USER 'root' IDENTIFIED WITH mysql_native_password BY 'SQLpassword';
這裡的SQLpassword代表你root的密碼。

二、線路佈置
本部份連接DHT11及ESP32,本請參考前篇:ESP32 溫濕度顯示器(DHT11+1602 LCD)
三、程式開發
本部份則是在Aruino IDE中撰寫程式,如何將資料上傳MySQL,我們將直接使用MySQL的library進行上傳,並說明注意事項。
1. 匯入MySQL Library
安裝"MySQL connector arduino" by Dr. Charles Bell,依照下圖開啟管理函式庫功能。
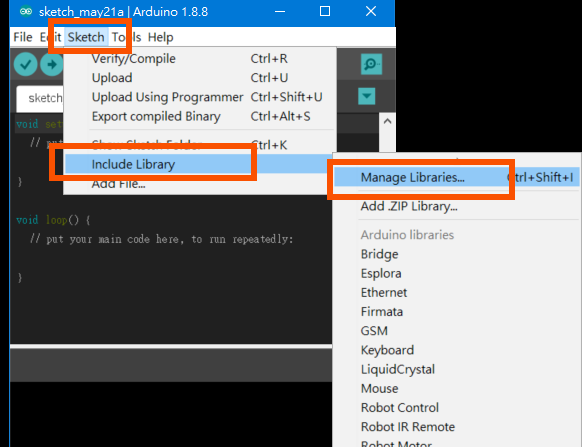
搜尋關鍵字MySQL ,即可找到所需的library,點選右側的Install安裝按鈕把他安裝起來。

2. 連線測試
接下來就可以先測試將值傳入過程是否正常,先使用以下程式進行測試,其中溫度及濕度是直接鍵入,目的在測試網路連線是否正常。要修改的部份包括無線網路的SSID及密碼,還有SQL資料庫的IP位址及帳號密碼,這裡有一個地方要注意的是server_addr是用「,」做區隔,而不是傳統的「.」做區隔。
//MySQL連線測試,手動寫入一個溫度及濕度資料做測試
#include <WiFi.h>
#include <MySQL_Connection.h>
#include <MySQL_Cursor.h>
const char ssid[] = "SSID";// change to your WIFI SSID
const char password[] = "SSIDPassword";// change to your WIFI Password
IPAddress server_addr(192,168,1,107);// change to you server ip, note its form split by "," not "."
int MYSQLPort =3306; //mysql port default is 3306
char user[] = "root";// Your MySQL user login username(default is root),and note to change MYSQL user root can access from local to internet(%)
char pass[] = "SQLpassword";// Your MYSQL password
WiFiClient client;
MySQL_Connection conn((Client *)&client);
void setup() {
Serial.begin(115200);
delay(10);
// We start by connecting to a WiFi network
Serial.println();
Serial.println();
Serial.print("Connecting to ");
Serial.println(ssid);
WiFi.begin(ssid, password);
//try to connect to WIFI
while (WiFi.status() != WL_CONNECTED) {
delay(500);
Serial.print(".");
}
Serial.println("");
Serial.println("WiFi connected");
Serial.println("IP address: ");
Serial.println(WiFi.localIP());
//try to connect to mysql server
if (conn.connect(server_addr, 3306, user, pass)) {
delay(1000);
}
else{
Serial.println("Connection failed.");
}
delay(2000);
//insert, change database name and values by string and char[]
char INSERT_SQL[] = "INSERT INTO tempandhumd.datalog (temp,humd) VALUES ('35','60')";//傳入的值固定為溫度,濕度為35,60
MySQL_Cursor *cur_mem = new MySQL_Cursor(&conn);
cur_mem->execute(INSERT_SQL);//execute SQL
delete cur_mem;
conn.close(); // close the connection
Serial.println("Data Saved.");
}
void loop() {
//do nothing
}
若上傳成功,在資料庫內就會出現剛剛上傳的資料


3. DHT11測試
依據「第九篇 ESP32 溫濕度顯示器(DHT11+1602 LCD)」的方式,將DHT11腳位訊號的腳位接在GPIO 14的位置(麵包板左側8),接下來程式改為每10秒讀取DHT11一次,並上傳資料庫,完成上傳後就立即斷線資料庫,等候下一個Loop。
#include <WiFi.h>
#include <MySQL_Connection.h>
#include <MySQL_Cursor.h>
#include <SimpleDHT.h>
const char ssid[] = "SSID";// change to your WIFI SSID
const char password[] = "SSIDPassword";// change to your WIFI Password
IPAddress server_addr(192,168,1,17); // change to you server ip, note its form split by "," not "."
int MYSQLPort = 3306; //mysql port default is 3306
char user[] = "root";// Your MySQL user login username(default is root),and note to change MYSQL user root can access from local to internet(%)
char pass[] = "SQLpassword";// Your MYSQL password
WiFiClient client;
MySQL_Connection conn((Client *)&client);
int pinDHT11 = 14;
SimpleDHT11 dht11(pinDHT11);
void setup() {
Serial.begin(115200);
delay(10);
// We start by connecting to a WiFi network
Serial.println();
Serial.println();
Serial.print("Connecting to ");
Serial.println(ssid);
WiFi.begin(ssid, password);
//try to connect to WIFI
while (WiFi.status() != WL_CONNECTED) {
delay(500);
Serial.print(".");
}
Serial.println("");
Serial.println("WiFi connected");
Serial.println("IP address: ");
Serial.println(WiFi.localIP());
//try to connect to mysql server
if (conn.connect(server_addr, 3306, user, pass)) {
delay(1000);
}
else {
Serial.println("Connection failed.");
}
delay(2000);
}
void loop() {
//讀取DHT11
byte temperature = 0;
byte humidity = 0;
int err = SimpleDHTErrSuccess;
if ((err = dht11.read(&temperature, &humidity, NULL)) != SimpleDHTErrSuccess) {
Serial.print("Read DHT11 failed, err="); Serial.println(err); delay(1000);
return;
}
Serial.print("Sample OK: ");
Serial.print((int)temperature); Serial.print(" *C, ");
Serial.print((int)humidity); Serial.println(" H");
//將溫濕度加入SQL字串
String INSERT_SQL = "INSERT INTO test.loj (t,h) VALUES ('" + String((int)temperature) + "','" + String((int)humidity) + "')";
MySQL_Cursor *cur_mem = new MySQL_Cursor(&conn);
cur_mem->execute(INSERT_SQL.c_str());//execute SQL
delete cur_mem;
conn.close();// close the connection
Serial.println("Data Saved.");
delay(10000);
}
查看序列視窗,可以發現上傳正常,查看資料庫,也可以發現資料都已經存入資料庫了。


 留言列表
留言列表